このように言うのは、僕自身が"この糞サイトのくそだりー手順"に途中からイラついてしまったからです。
先ず、なんでこの糞サイ、、、いえ、"UUP dump"を使うか?ですが
"Windows11 ARM64ビルド版"をダウンロードできるからです。
まぁ、ハッキリ言いますが、さっさとMicrosoftの方でこんなゴミサイトを駆逐すべきです。
Microsoftで"Windows11 ARM64ビルド版"のISOイメージを配布すりゃ"UUP dump"とかいうクソゴミサイトなんか必要ないからです。
"Windows11 ARM64ビルド版"の入手以外は、基本的にMicrosoftからダウンロードしてください。
UUP dump
- Windows11 ARMビルド版 ISOイメージ

Microsoft
- Windows11 x64ビルド版 ISOイメージ
- Windows 11 on Arm Insider Preview(評価版)ISOイメージ
UUP dump を使うケースは"Windows11 ARM64ビルド版のダウンロードだけ"です。
"仕方ない"からUUP dump を使う程度です。
そんな"仕方なくUUP dump を使う人"のために、この記事を書いています。※なるべくUUP dumpを使わないようにしましょう。
なので、この記事ではUUP dump からダウンロードしたスクリプト(shファイル)からWindowsのISOファイルを作る方法について解説します。
Microsoftは、さっさとクソ雑魚ゴミサイト"UUP dump"を駆逐すべき
UUP dumpの使い方を解説する前に、まず言っておかないと気が済まないので書いておきます。
僕らはUUP dump を仕方なく使っています。
MicrosoftではWindows11 x64ビルド版を配布しているのに、どうしてWindows11 ARM64ビルド版を配布してくれないのか?
Microsoftの中の人が見ていたら、さっさとこのクソ雑魚ゴミサイト"UUP dump"を駆逐して下さい。Windows11 ARM64ビルド版を配布すれば良いだけです。
クソサイト
"UUP dump"
- Microsoft公認でも何でもない。
- 訳わからんスクリプトを実行するのでセキュリティ的に不透明。
- ISOイメージを作成するのがダルい。
何より問題はセキュリティです。
UUP dump ではISOイメージ作成のスクリプトをダウンロードして、そのスクリプトを自分で実行してISOイメージを作成する方法をとっています。
わざわざクソだるい"自分でスクリプトを実行"という手順でISOイメージを作成するわけです。この時点で何されていても可笑しくないんですよね。
何よりも、僕自身が"このくそだりー手順"に途中からイライラしてしまって、この糞サイト"UUP dump "の存在価値に疑問を感じてしまったからです。
UUP dump でWindows 11 のISOファイルを作成する流れ
それでは"UUP dump を仕方なく使う方法"を解説していきます。
UUP dumpからダウンロードするのはWindows11のISOファイルではありません。UUP dumpからダウンロードするのはISO生成するスクリプトファイルです。
そのスクリプトを実行して自分でISOファイルを作成します。
ISOファイルを作成する手順
- MacにHomebrewをインストール
- ① UUP dump スクリプト実行環境の準備
- ② UUP dump からWindows 11 ARM64スクリプトをダウンロード
- ③ UUP dump スクリプト(shファイル)からISOファイルを作成
かなり手間です。
僕はスクリプトファイルからISOイメージ作成という不自然な手順のせいで「いやいや、最初からISOイメージを配布しろや」と、かなりイライラしました。
手順が"クソだるい"ので、各自イライラには注意してください。
前準備:Homebrew をインストールする

Homebrewをインストールしておきましょう。Homebrewは、Macユーザーなら100%インストールするパッケージマネージャーです。
※すでにHomebrewをインストールしている方は読み飛ばして下さい。
/bin/bash -c "$(curl -fsSL https://raw.githubusercontent.com/Homebrew/install/HEAD/install.sh)"上のコマンドでインストールできます。
.zprofileにPATHを追加してくださいと表示されるので下のコマンドを実行します。
==> Next steps:
- Run these two commands in your terminal to add Homebrew to your PATH:
    echo 'eval "$(/opt/homebrew/bin/brew shellenv)"' >> /Users/ユーザー名/.zprofile
    eval "$(/opt/homebrew/bin/brew shellenv)"
- Run brew help to get started
- Further documentation:
    https://docs.brew.sh
brew -vなどして.zprofileにPATHが追加されたのを確認すれば完了です。
Homebrewの基本的な使い方は下記を参考にして下さい。

① UUP dump からWindows 11 ARM64スクリプトをダウンロード
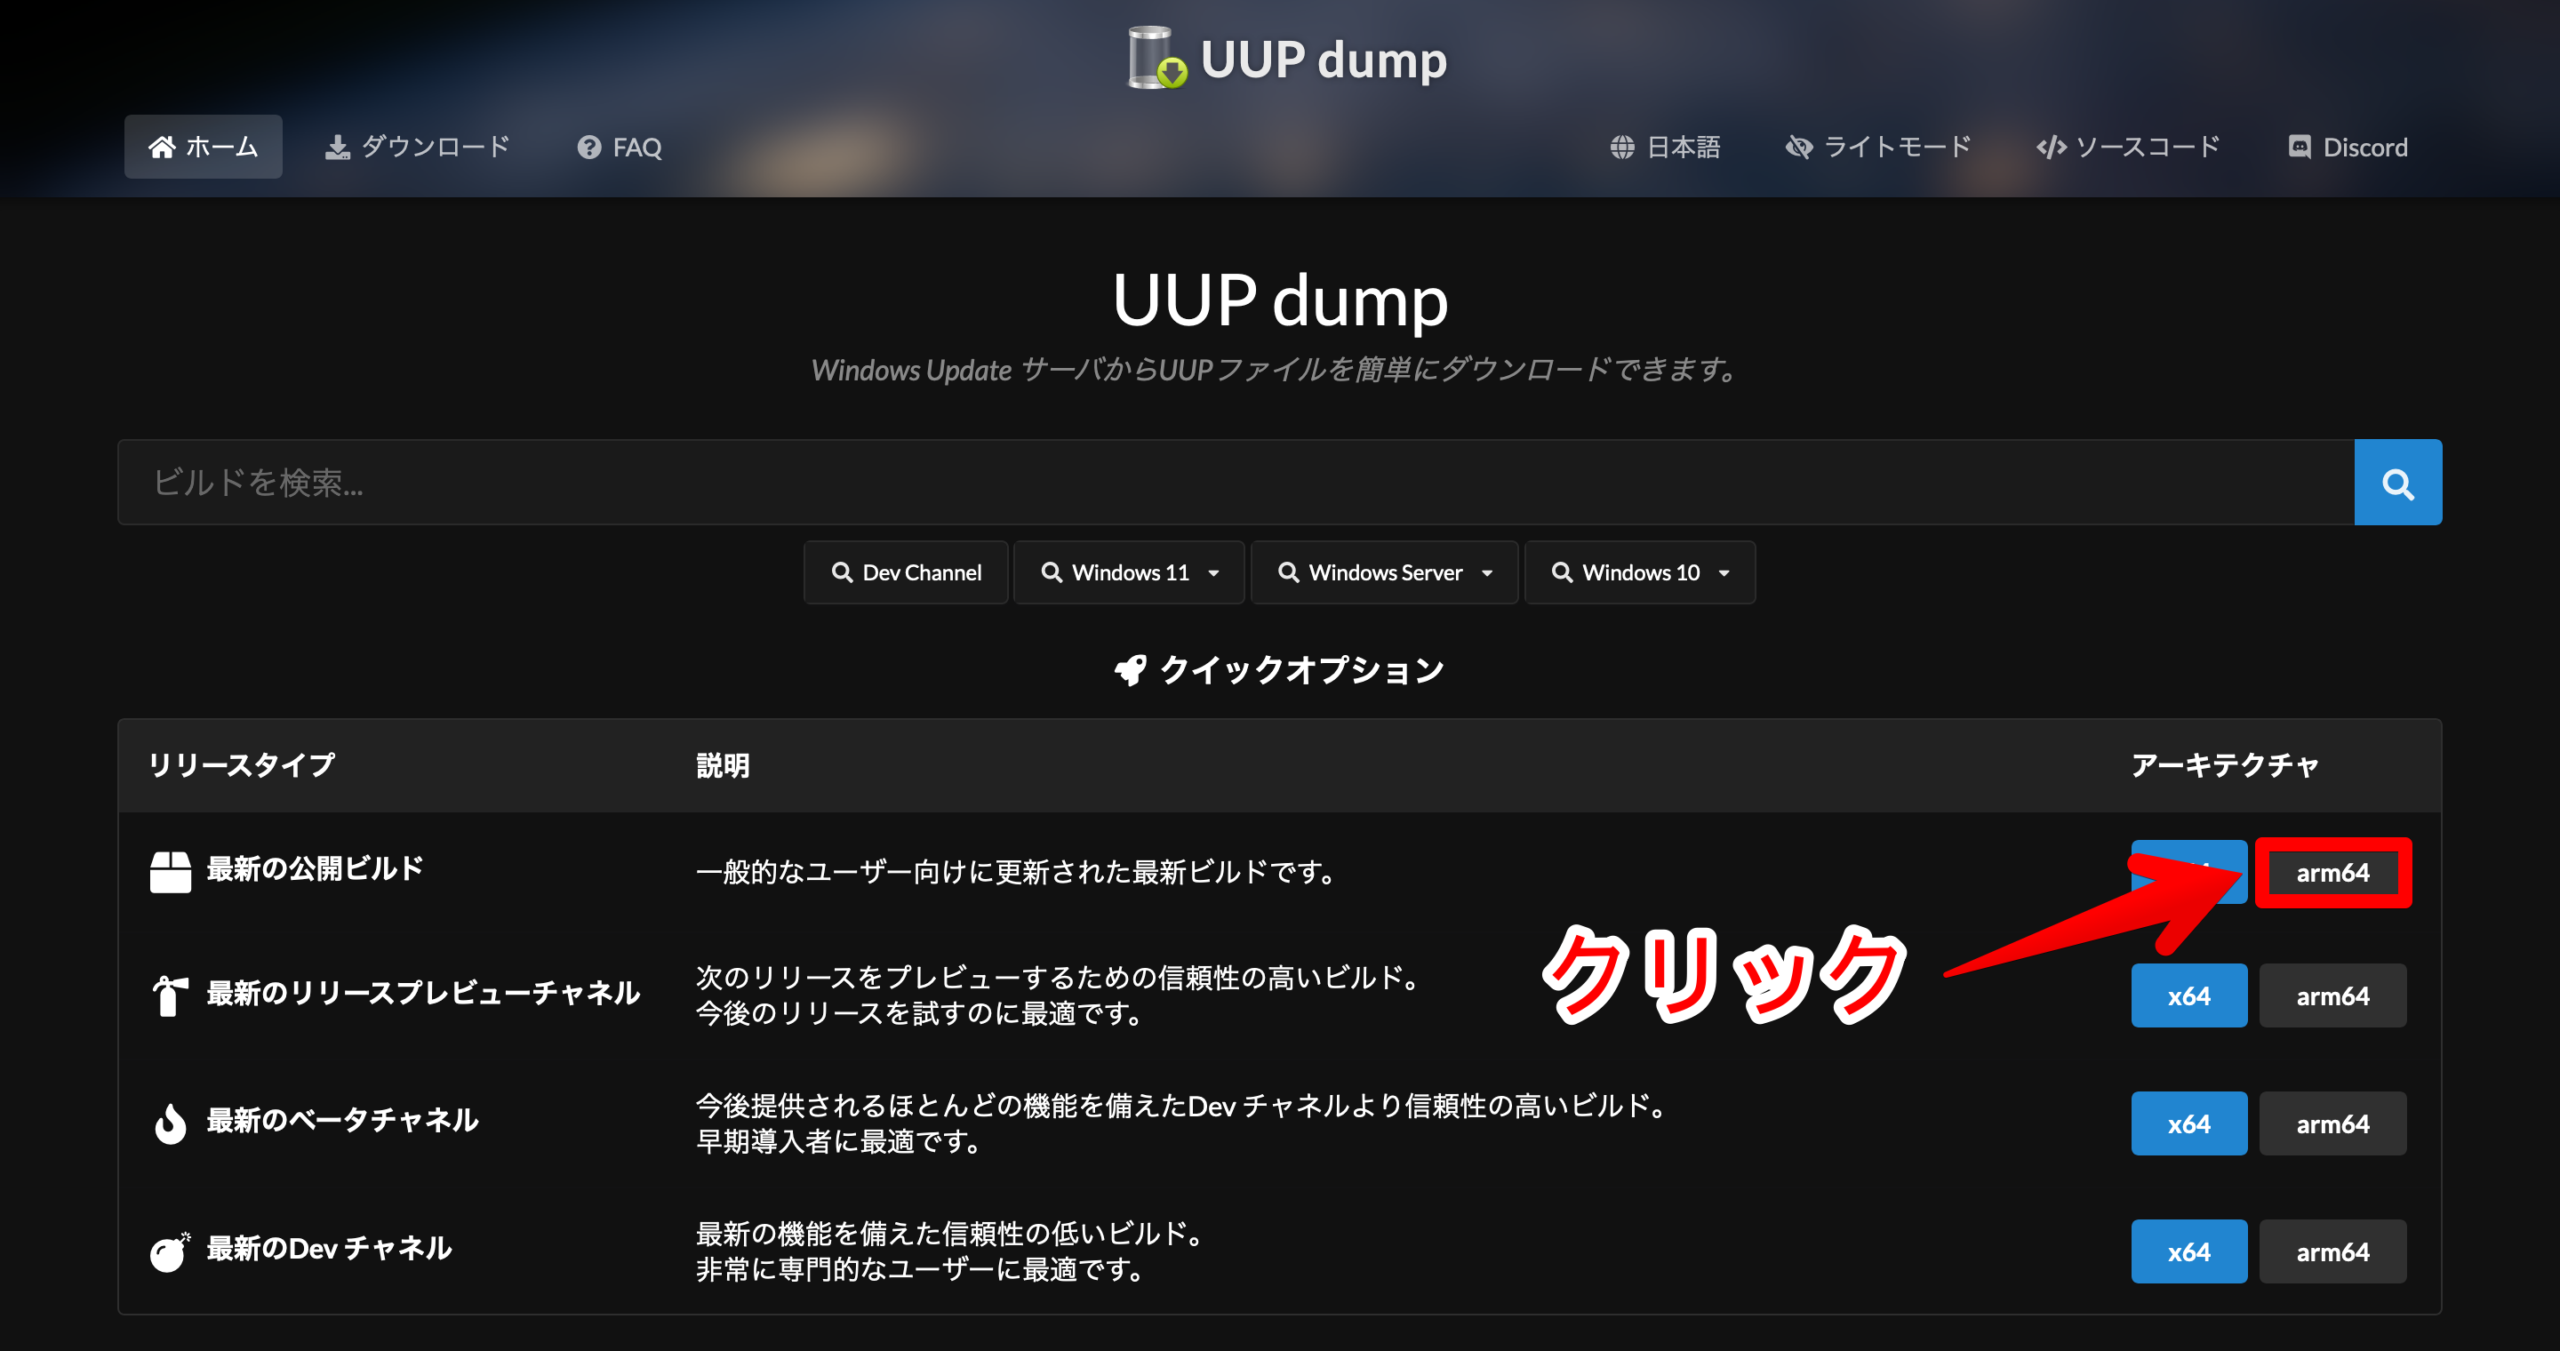
今回必要とするISOファイルはWindows11 ARM64ビルド版です。
UUP dump トップにある最新の公開ビルド欄の「arm64」をクリックします。
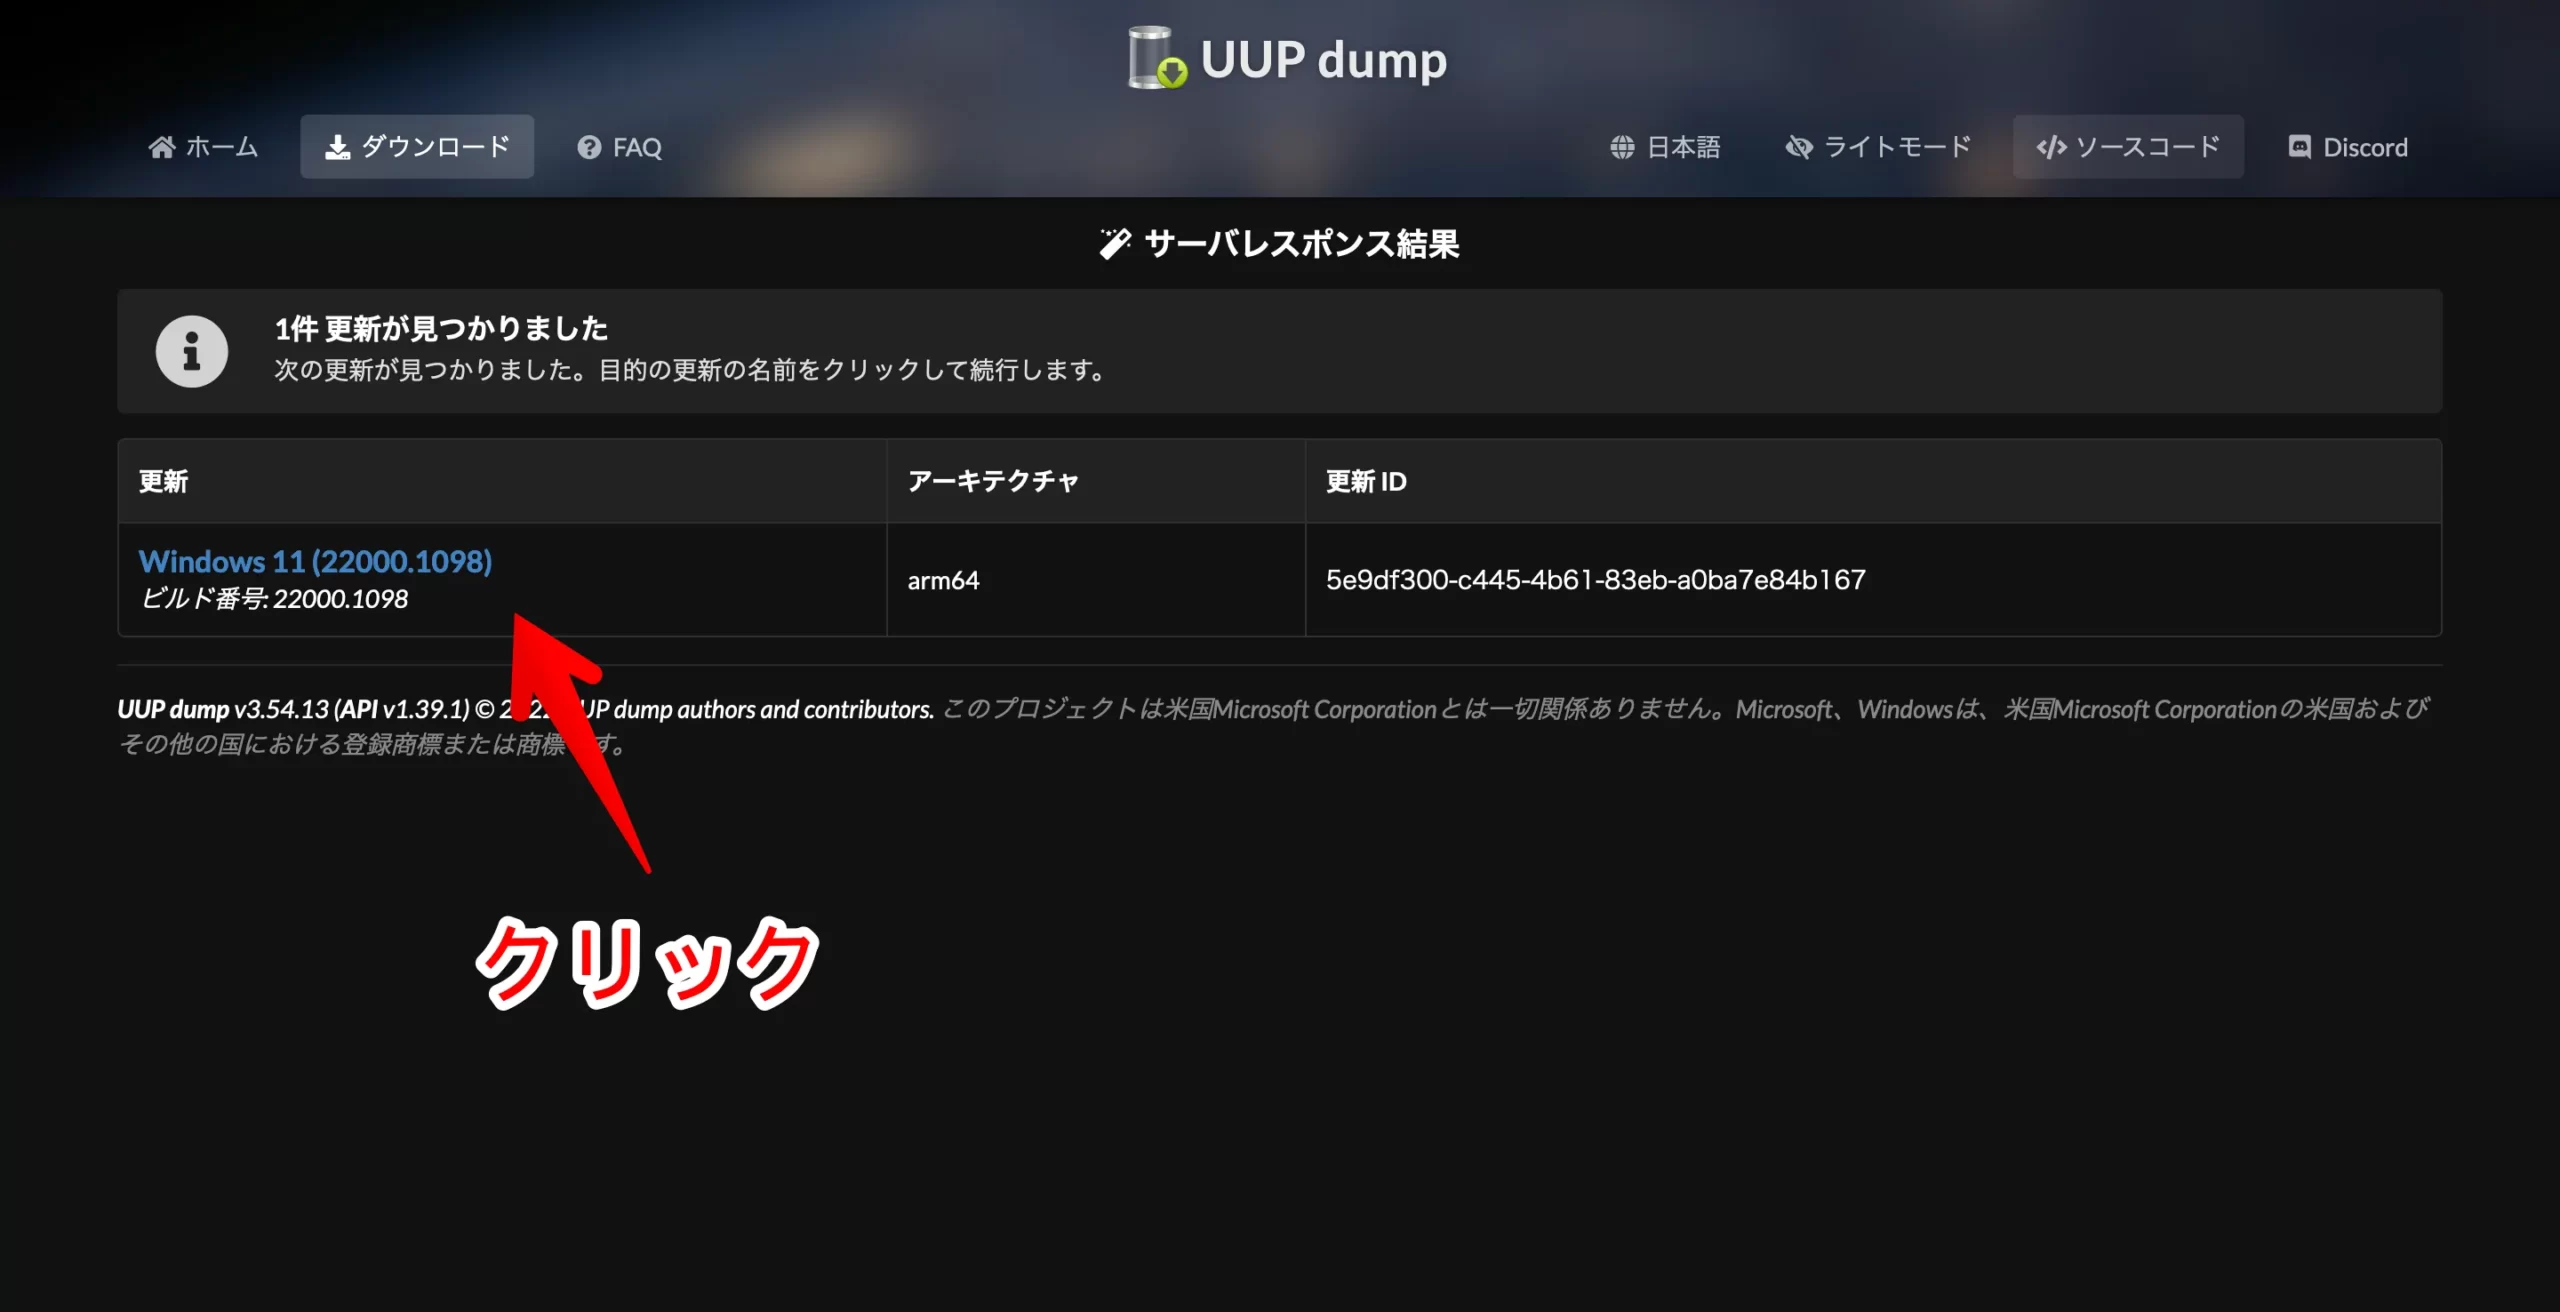
最新のWindows11 ARM64ビルド版が表示されています。
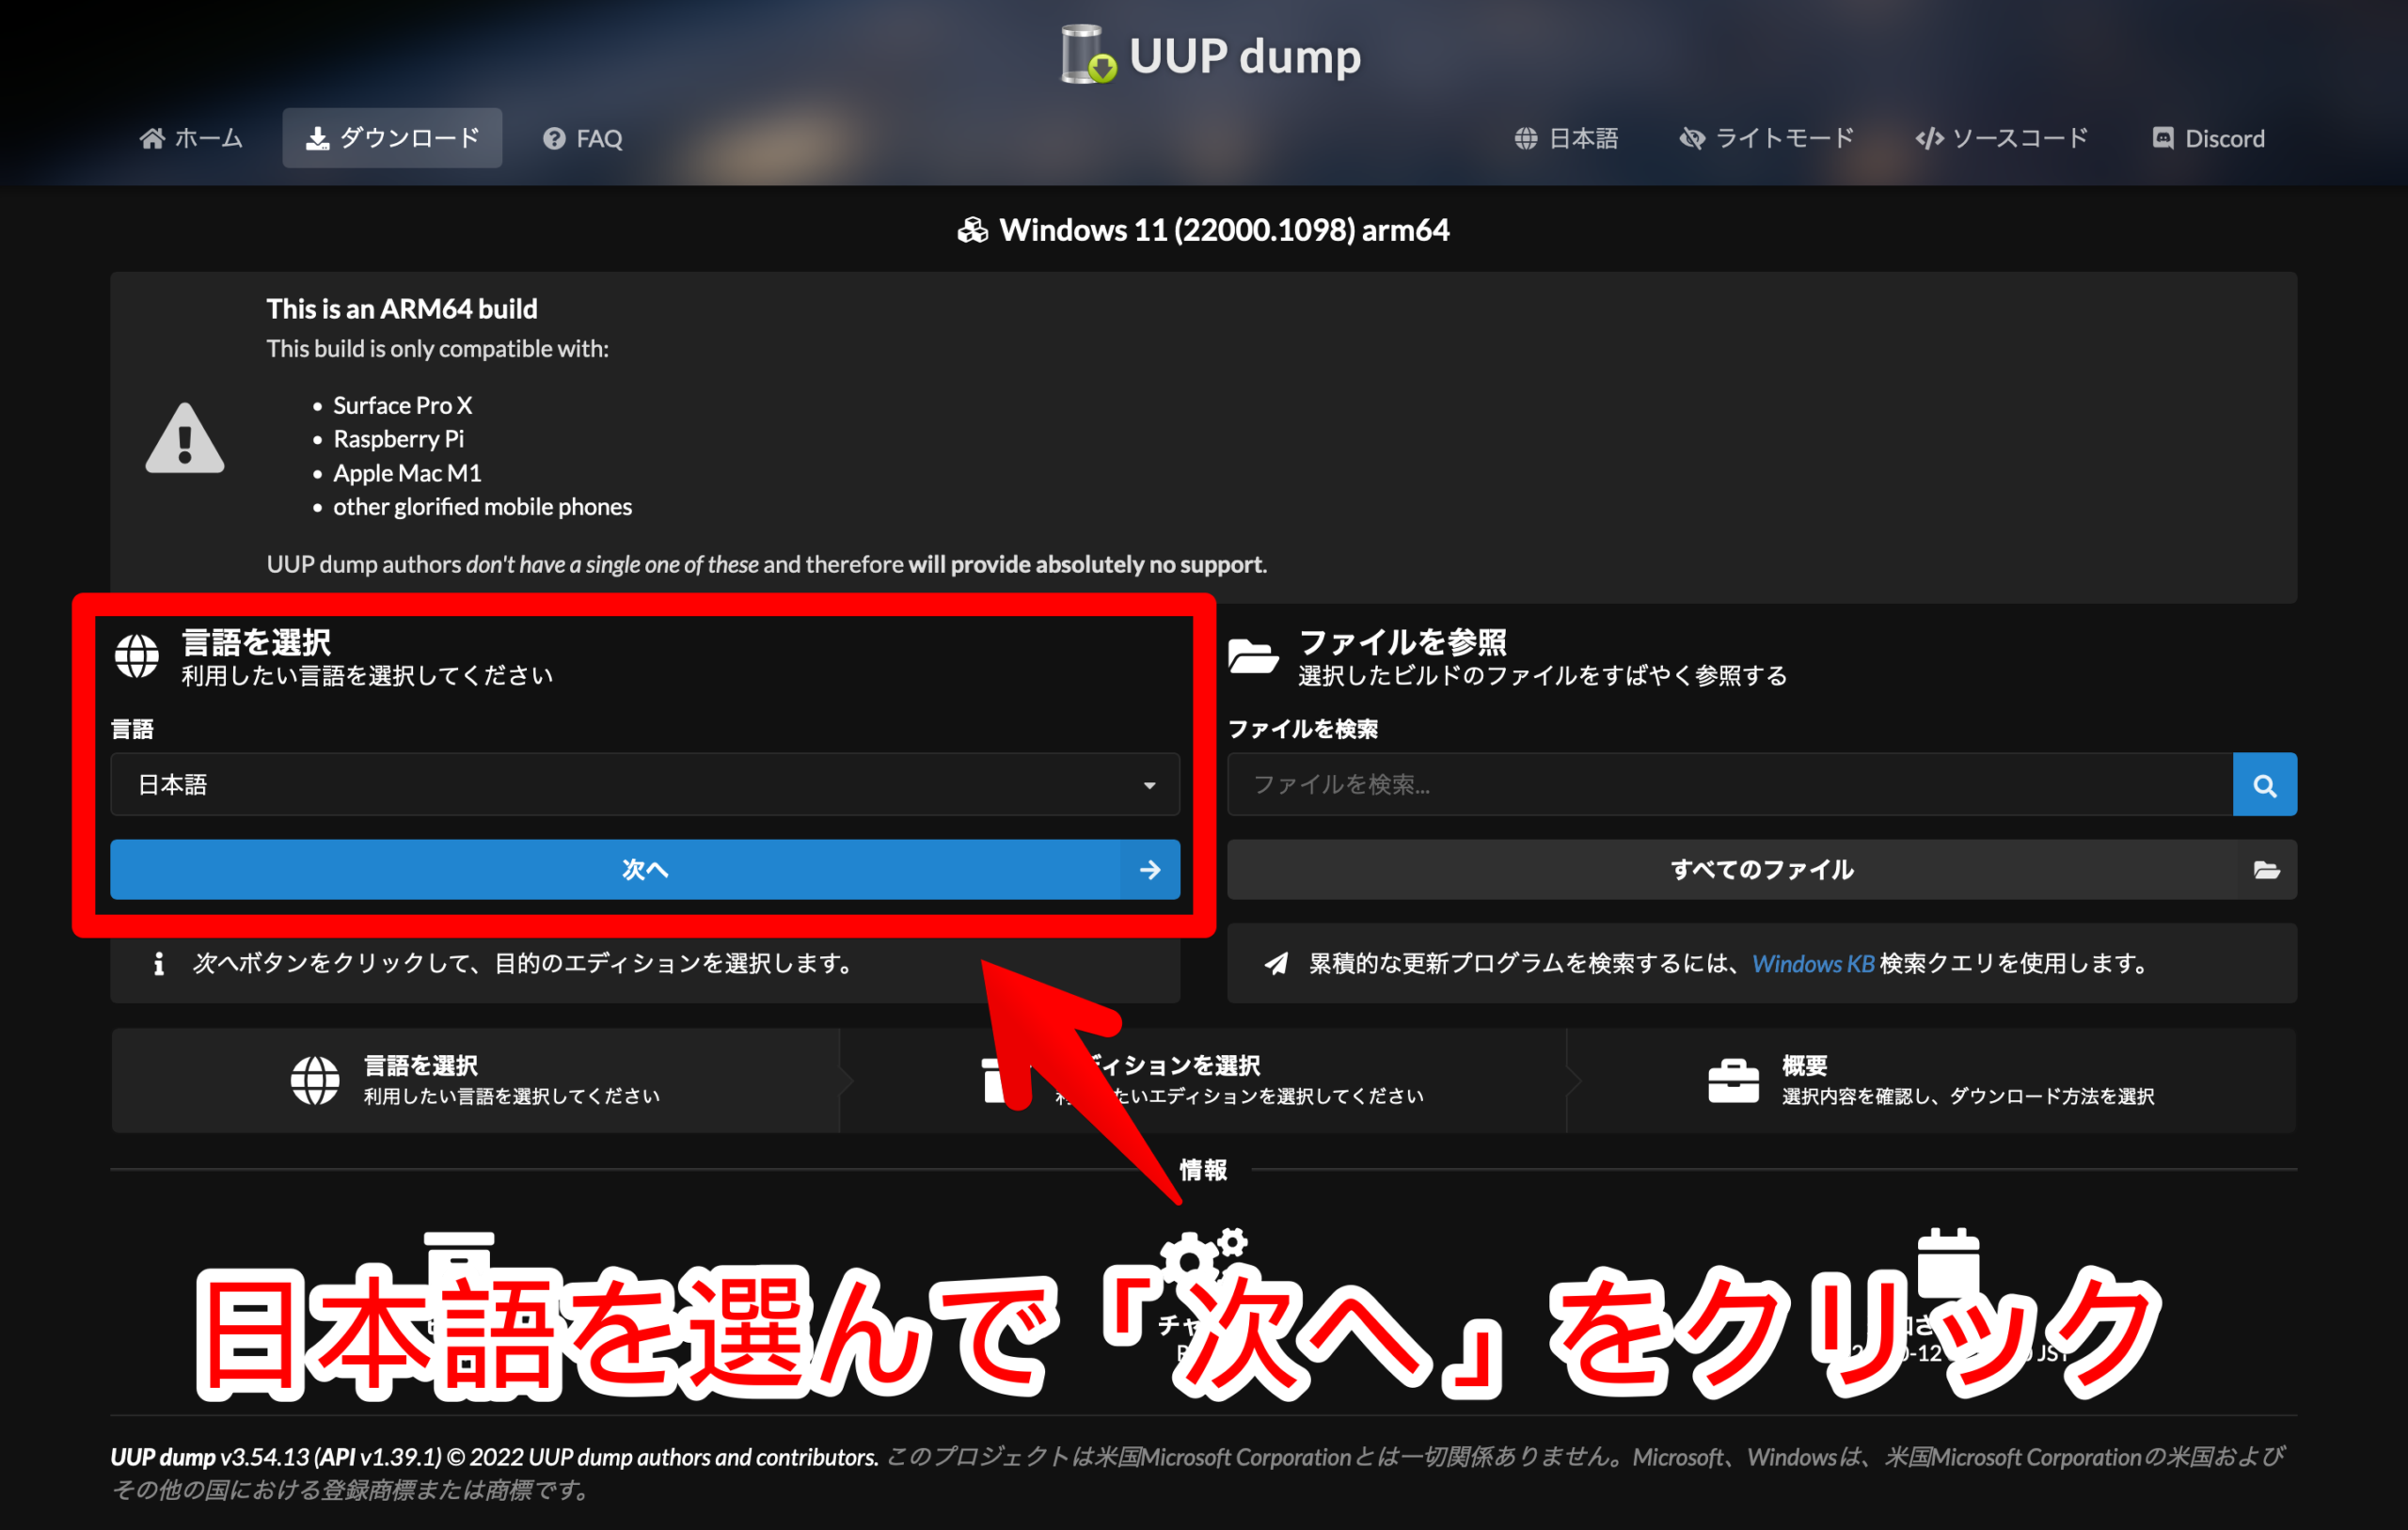
日本語を選んで「次へ」をクリックします。
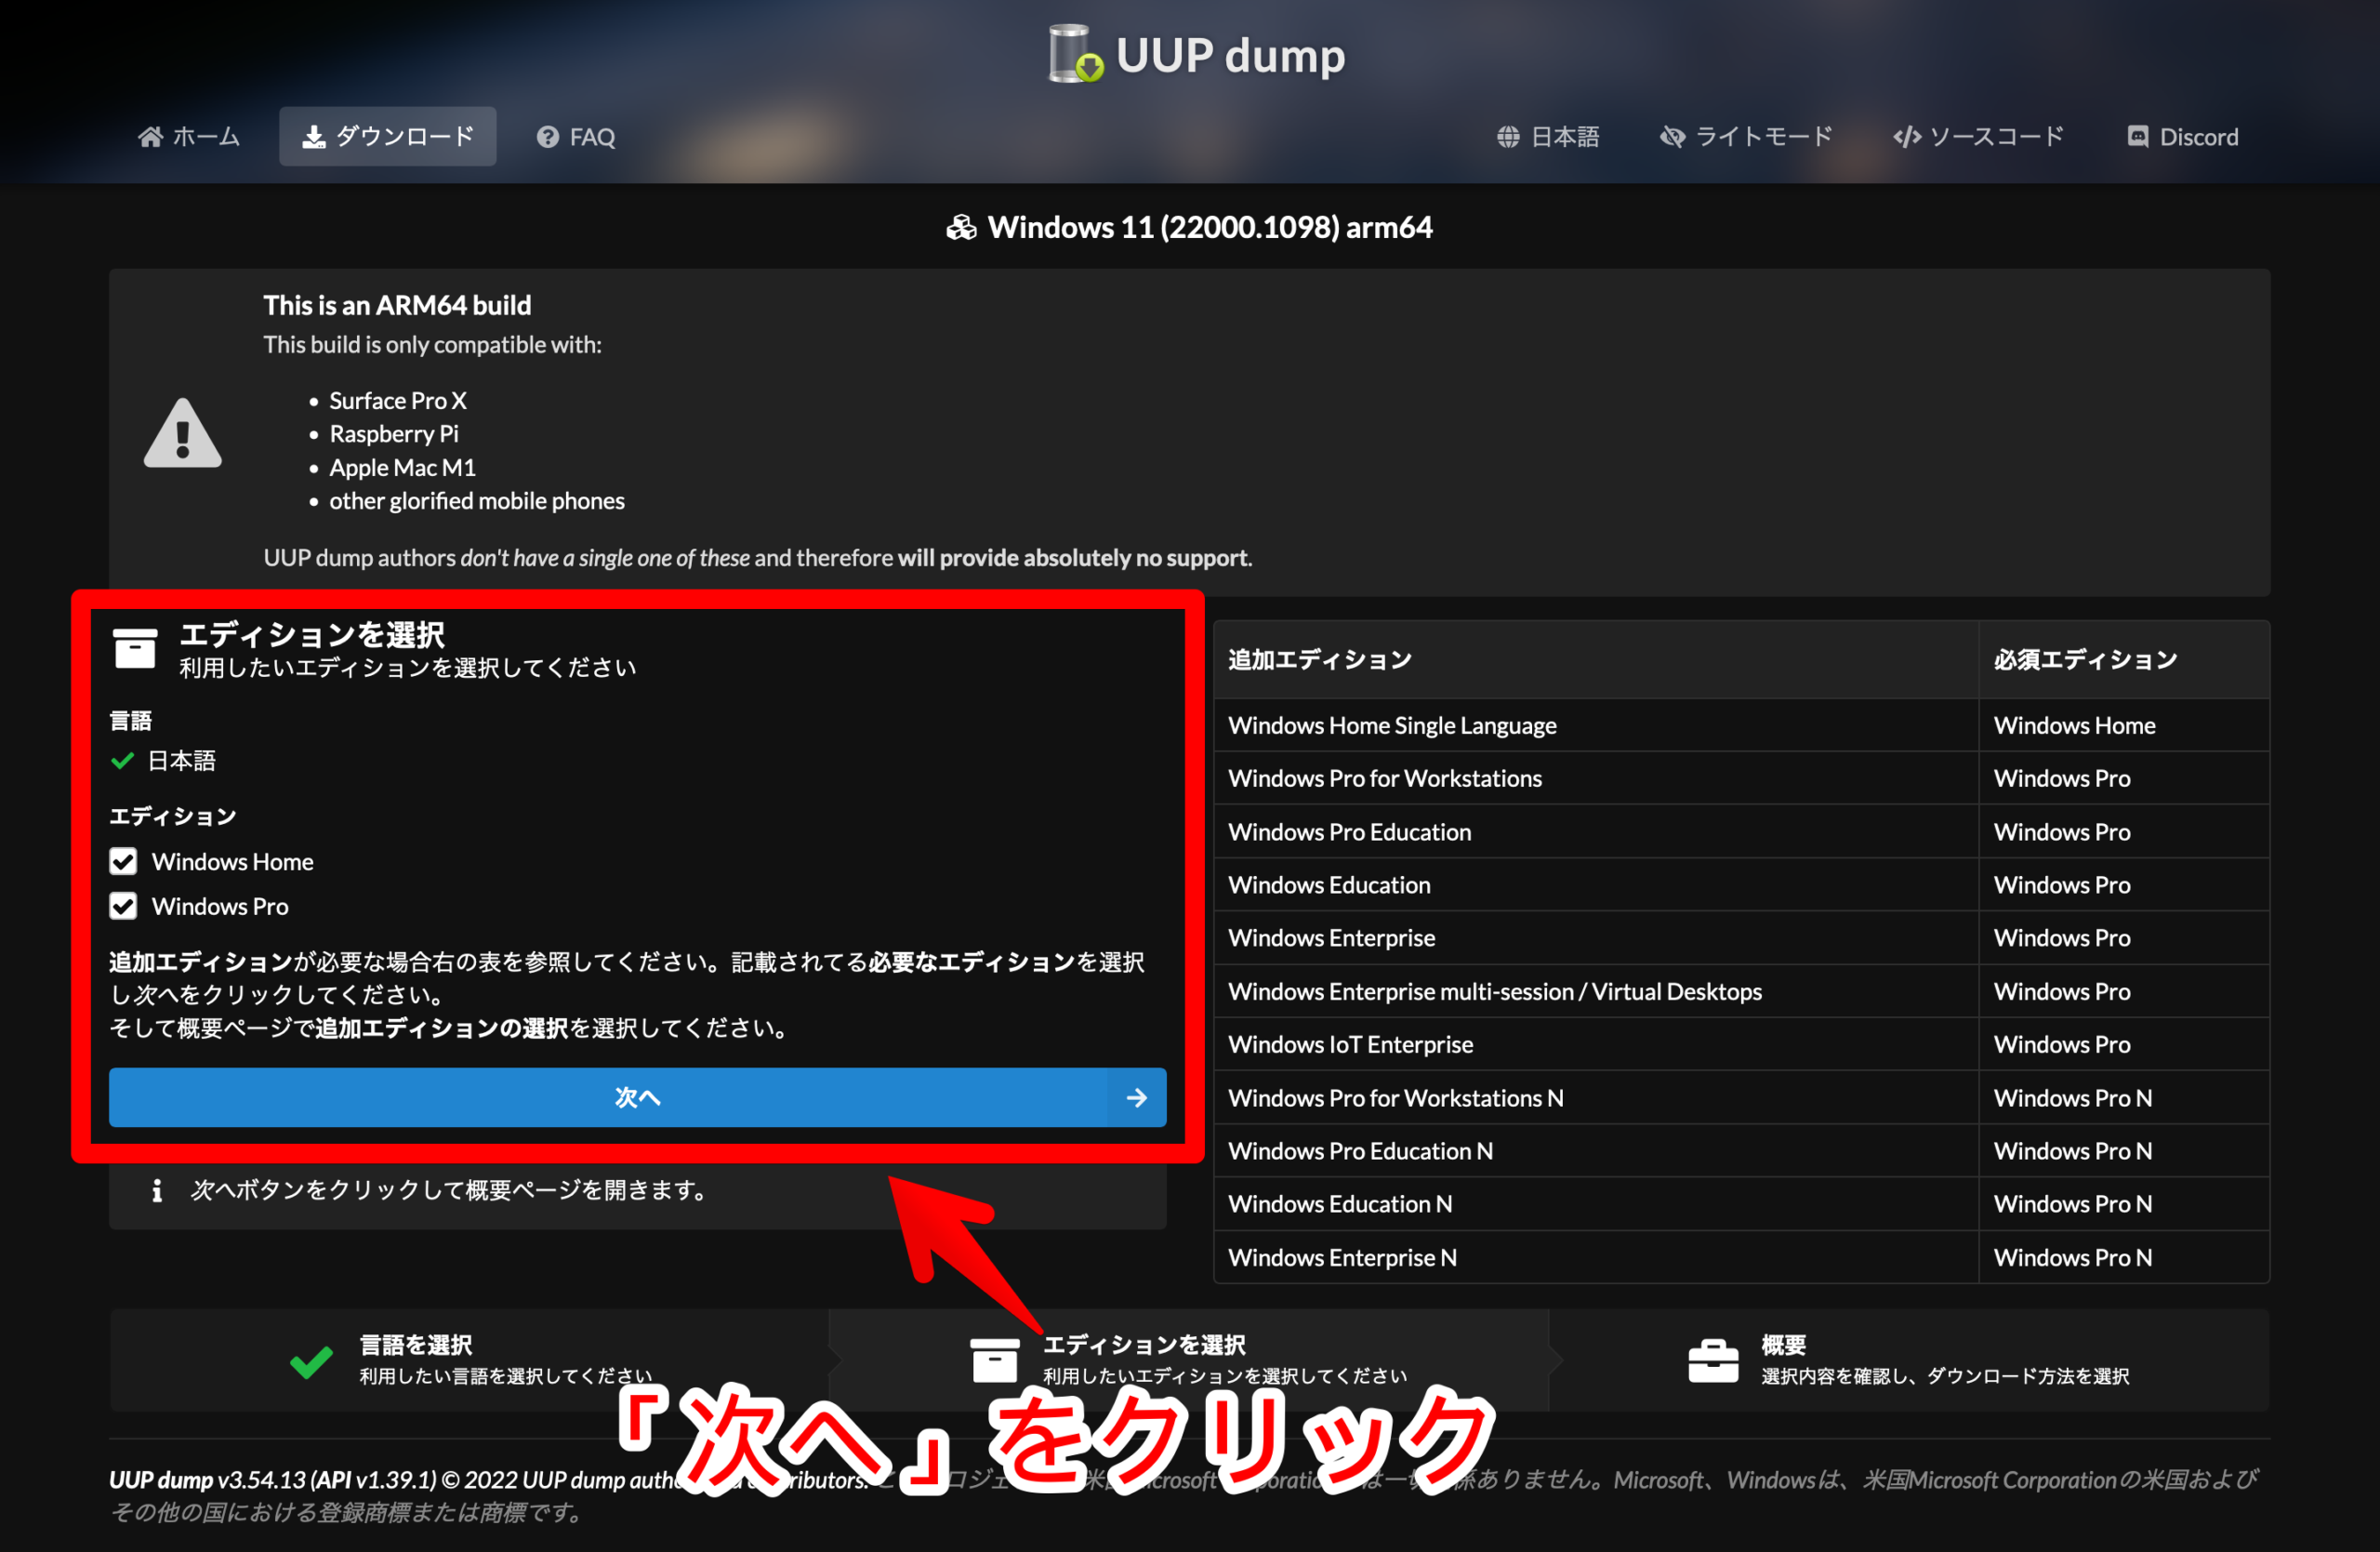
これもそのまま「次へ」をクリックします。
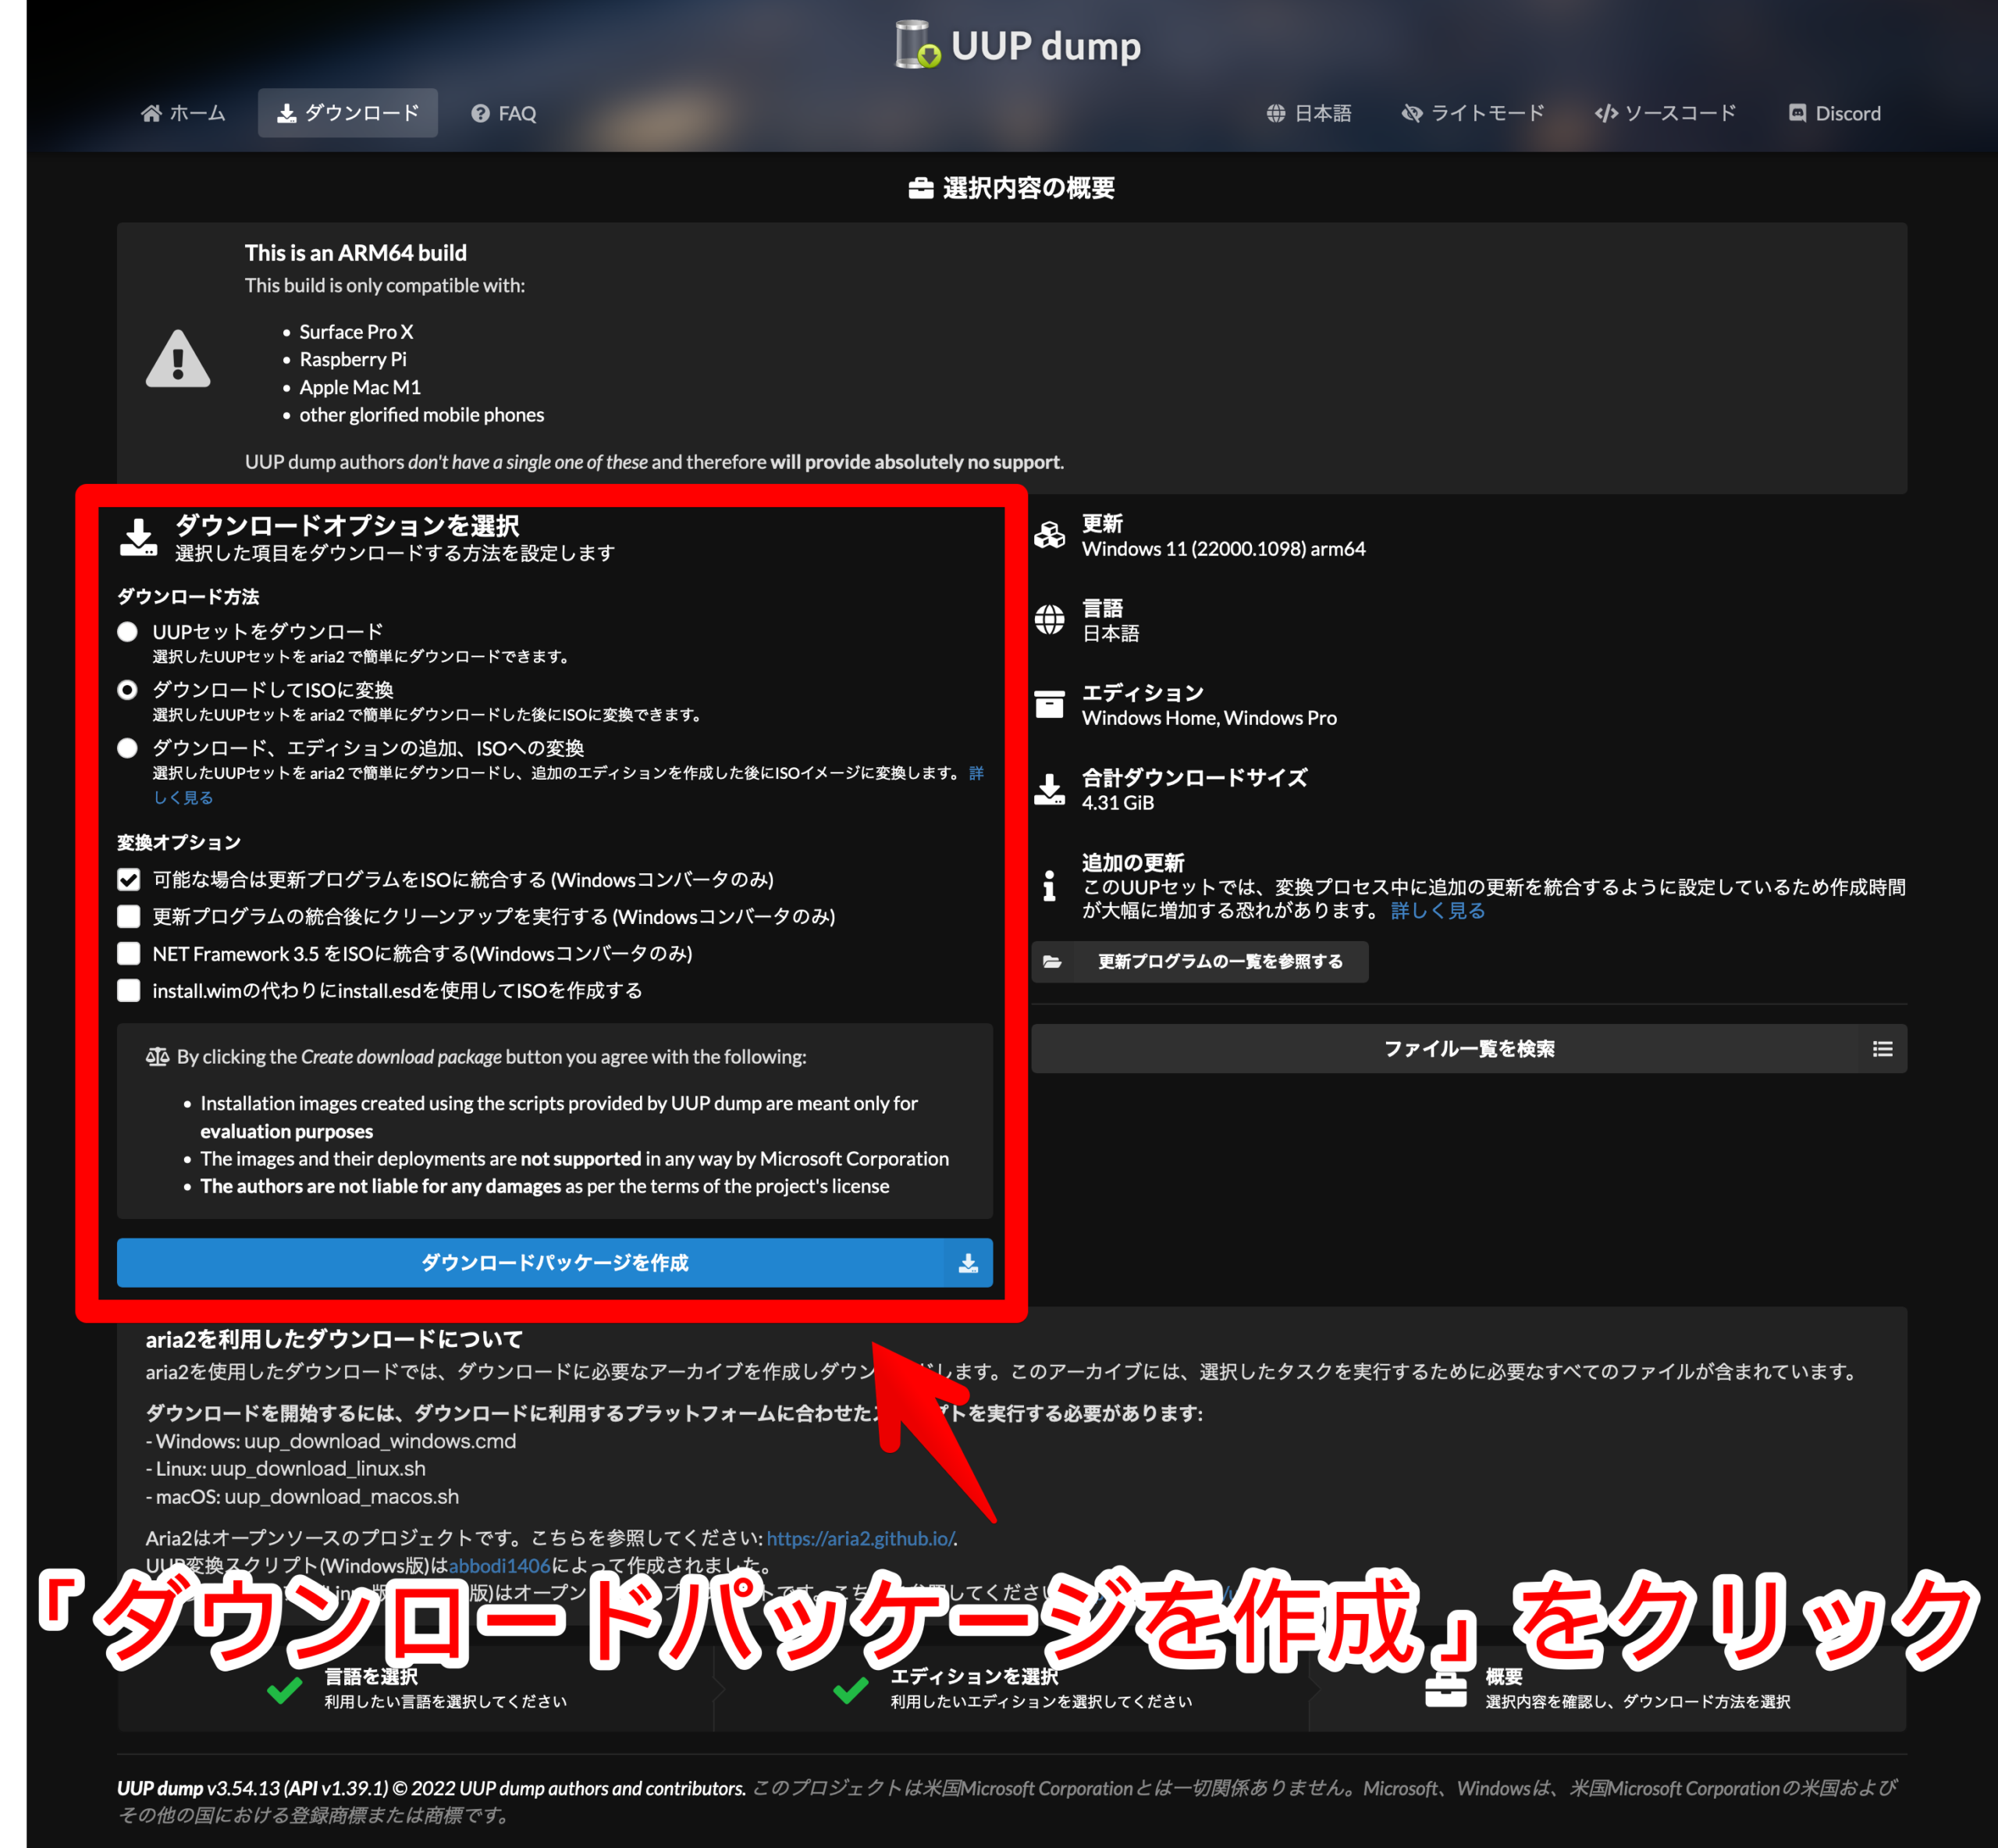
チェックボックスは、最初にチェックされているまんまで構いません。「ダウンロードパッケージを作成」をクリックします。

スクリプトフォルダがダウンロードされます。
いくつかスクリプトファイルが入っていますが、Mac環境で実行するスクリプトファイル名は「uup_download_macos.sh」です。
② UUP dump スクリプト実行環境の準備
作業環境は下記です。
- UUP dump フォルダ名:22000.1098_arm64_ja-jp_multi_5e9df300_convert
- フォルダ場所:ダウンロード ※Mac既定
- ターミナル起動時のカレントディレクトリ: 〜(ホームフォルダ)
UUP dump でダウンロードしたスクリプトファイル「uup_download_macos.sh」を実行するには、実行するための環境を作成する必要があります。
スクリプトを実行する環境は下記手順で構築します。
手順
- 1. 実行権限を付与:chmod +x ./uup_download_macos.shに
- 2. mdファイルを確認する
- 3. リポジトリ追加: brew tap sidneys/homebrew
- 4. フォーミュラ追加①:brew install cabextract wimlib cdrtools sidneys/homebrew/chntpw
- 5. フォーミュラ追加②:brew install aria2(aria2cではないので注意)
そもそも、MicrosoftでWindows11 ARM64のビルド版を配布してさえいれば、こんなよく分からなんUUP dumpとかいうクソサイトなんか使わねーのにな。
と思いつつ作業しました。
1. 実行権限を付与:chmod +x ./uup_download_macos.shに
Last login: Sat Oct 15 00:13:25 on ttys000
~ % cd ~/Downloads/22000.1098_arm64_ja-jp_multi_5e9df300_convert
まずUUP dump からダウンロードしたスクリプトフォルダの場所に移動します。
僕の環境ではMac既定のダウンロードフォルダ直下にスクリプトファイルを置きました。なので、cd ~/Downloads/22000.1098_arm64_ja-jp_multi_5e9df300_convertで移動します。
~/Downloads/22000.1098_arm64_ja-jp_multi_5e9df300_convert % ./uup_download_macos.sh
zsh: permission denied: ./uup_download_macos.sh./uup_download_macos.shでそのままshスクリプトファイルを実行しようとするとzsh: permission denied: ./uup_download_macos.shと実行権限がないと表示されます。
~/Downloads/22000.1098_arm64_ja-jp_multi_5e9df300_convert % chmod +x uup_download_macos.shchmod +x uup_download_macos.shでスクリプトファイルに実行権限を付与します。
~/Downloads/22000.1098_arm64_ja-jp_multi_5e9df300_convert % ./uup_download_macos.sh
aria2c does not seem to be installed
Check the readme.unix.md for detailsreadme.unix.mdを確認してくれと言われます。aria2cフォーミュラのインストールは後ほど対応します。
aria2cではなくてaria2とりあえず、aria2cインストールコマンドbrew install aria2cを打ってみます。
~/Downloads/22000.1098_arm64_ja-jp_multi_5e9df300_convert % brew install aria2c
Running `brew update --auto-update`...
==> Auto-updated Homebrew!
Updated 2 taps (homebrew/core and homebrew/cask).
==> New Formulae
autocorrect                git-machete                pgsync
:
:
:
chipmunk                   random-mouse-clicker

You have 3 outdated formulae installed.
You can upgrade them with brew upgrade
or list them with brew outdated.

Warning: No available formula with the name "aria2c". Did you mean aria2?
==> Searching for similarly named formulae...
This similarly named formula was found:
aria2
To install it, run:
  brew install aria2
==> Searching for a previously deleted formula (in the last month)...
Error: No previously deleted formula found.
==> Searching taps on GitHub...
Error: No formulae found in taps.
フォーミュラが見つからないエラー
- Warning: No available formula with the name "aria2c". Did you mean aria2?(aria2cでなくてaria2じゃないですか?)
- Error: No formulae found in taps.(登録リポジトリ(taps)にフォーミュラがありません。)
"aria2c"ではなくaria2をインストールしましょう。
また、念の為、readme.unix.mdを確認してみましょう。
2. mdファイルを確認する
mdファイルとは何か?
mdファイルは、Markdownを使用して作成されたテーブル、テキスト、およびそのフォーマットで保存されたファイルです。拡張子は「.md」です。
readme.unix.md
macOS
-----
macOS requires [Homebrew](https://brew.sh) to install the prerequisite software.
After Homebrew was installed, you can install the requirements using:

```bash
brew tap sidneys/homebrew
brew install cabextract wimlib cdrtools sidneys/homebrew/chntpw
```
readme.unix.mdを読むと、sidneys/homebrewリポジトリを追加、その後で該当フォーミュラをインストールしてくださいとのことです。
コマンド
- brew tap sidneys/homebrew
- brew install cabextract wimlib cdrtools sidneys/homebrew/chntpw
- brew install aria2(aria2cではないので注意)
ということで、上のコマンドを実行するだけだと分かります。
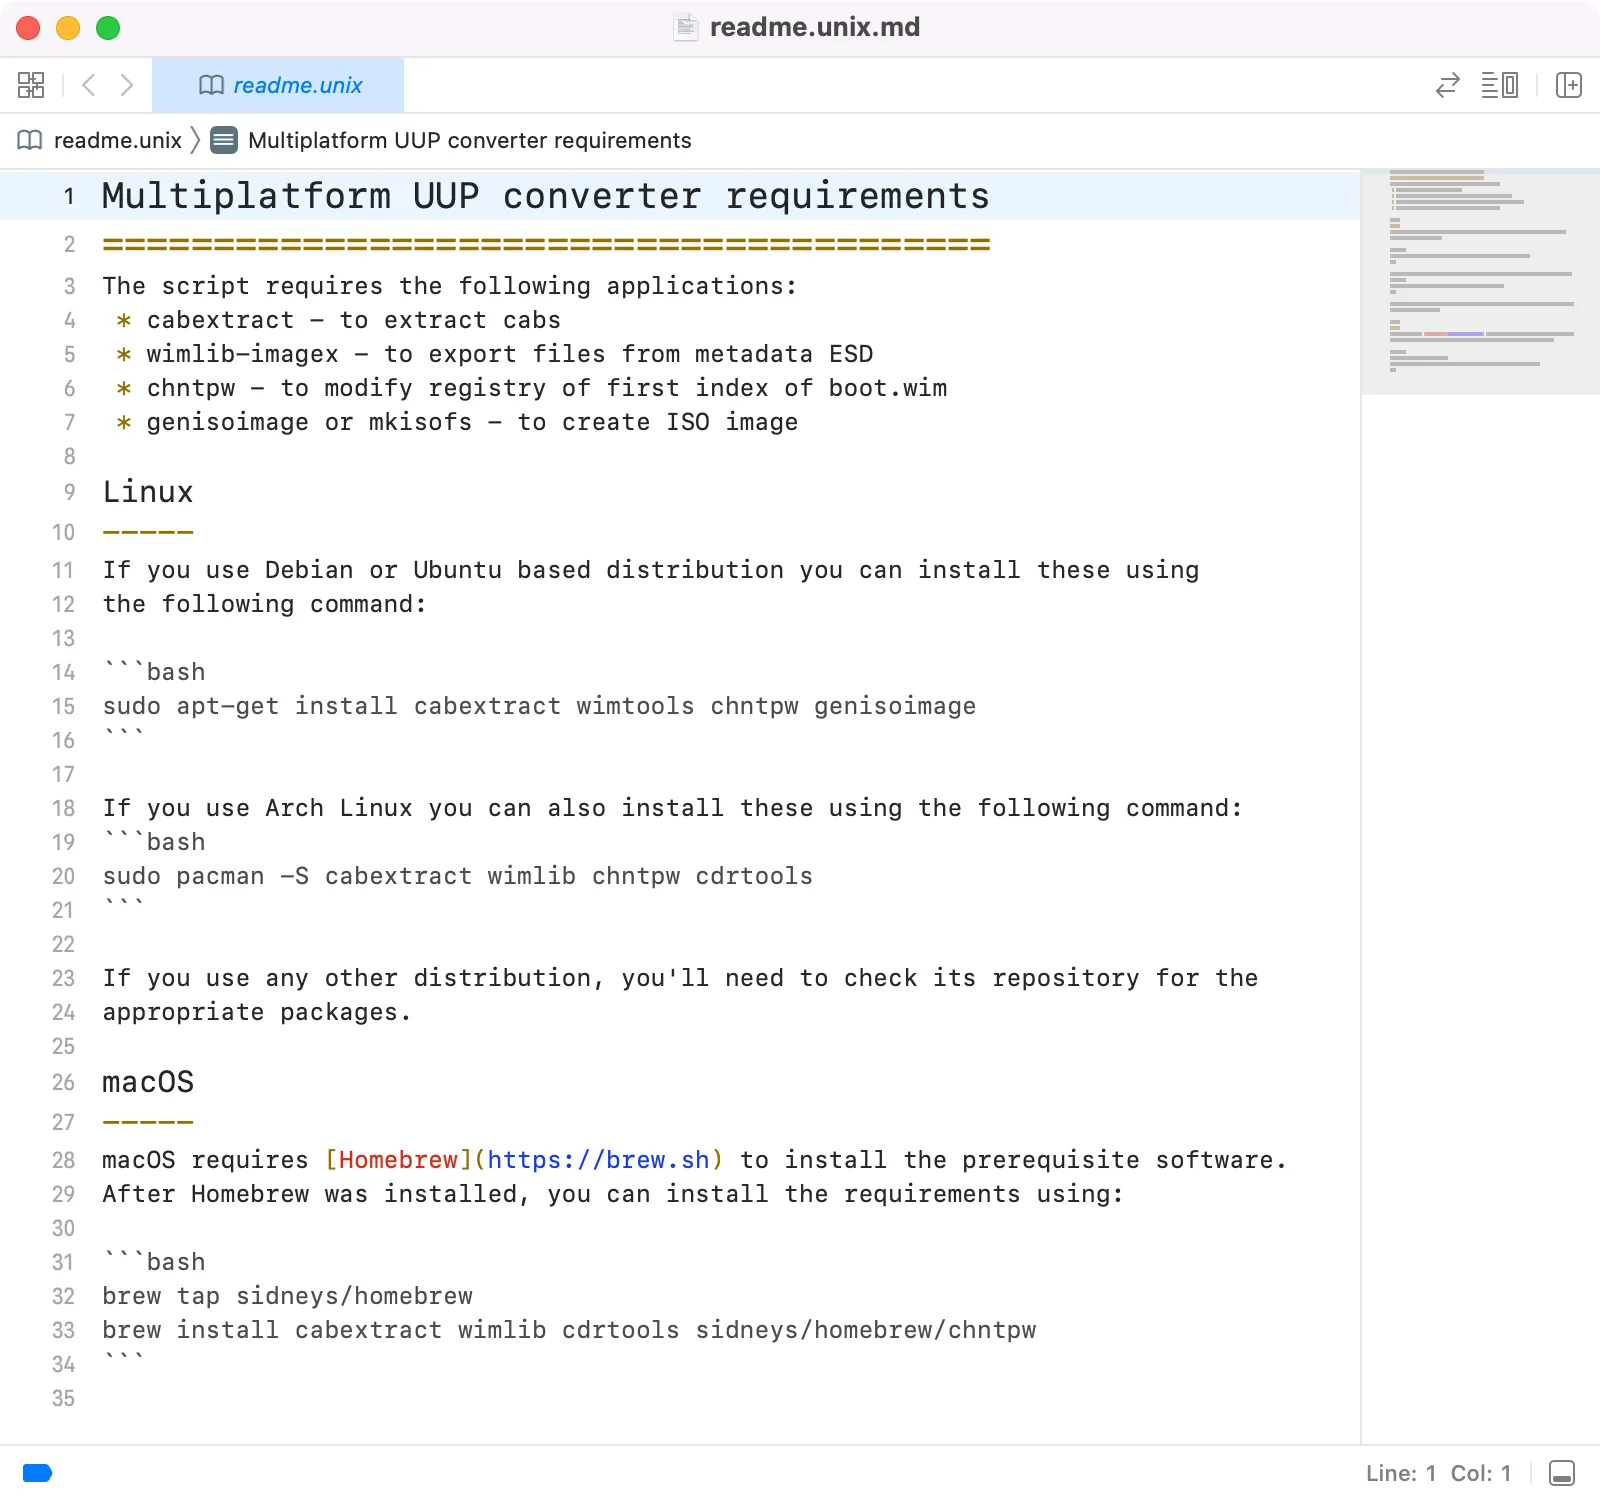
readme.unix.mdは、テキストエディット、Xcodeのどちらかで開くことができます。Xcodeが入っていれば、クリックだけで.mdファイルが開きます。
3. リポジトリ追加: brew tap sidneys/homebrew
実行結果
~/Downloads/22000.1098_arm64_ja-jp_multi_5e9df300_convert % brew tap sidneys/homebrew
==> Auto-updated Homebrew!
Updated 1 tap (homebrew/core).

You have 3 outdated formulae installed.
You can upgrade them with brew upgrade
or list them with brew outdated.

==> Tapping sidneys/homebrew
Cloning into '/opt/homebrew/Library/Taps/sidneys/homebrew-homebrew'...
remote: Enumerating objects: 496, done.
remote: Counting objects: 100% (110/110), done.
remote: Compressing objects: 100% (46/46), done.
remote: Total 496 (delta 75), reused 82 (delta 64), pack-reused 386
Receiving objects: 100% (496/496), 109.64 KiB | 2.74 MiB/s, done.
Resolving deltas: 100% (204/204), done.
Tapped 10 casks and 29 formulae (51 files, 206.7KB).
無事に sidneys/homebrewリポジトリが追加されました。
4. フォーミュラ追加①:brew install cabextract wimlib cdrtools sidneys/homebrew/chntpw
実行結果
~/Downloads/22000.1098_arm64_ja-jp_multi_5e9df300_convert % brew install cabextract wimlib cdrtools sidneys/homebrew/chntpw
==> Downloading https://ghcr.io/v2/homebrew/core/cabextract/manifests/1.9.1
######################################################################## 100.0%
==> Downloading https://ghcr.io/v2/homebrew/core/cabextract/blobs/sha256:7b76f71
:
:
:
==> Downloading from https://codeload.github.com/sidneys/chntpw/tar.gz/refs/tags
######################################################################## 100.0%
==> Pouring cabextract--1.9.1.arm64_monterey.bottle.tar.gz
🍺  /opt/homebrew/Cellar/cabextract/1.9.1: 10 files, 183.7KB
==> Running `brew cleanup cabextract`...
Disable this behaviour by setting HOMEBREW_NO_INSTALL_CLEANUP.
Hide these hints with HOMEBREW_NO_ENV_HINTS (see `man brew`).
==> Installing dependencies for wimlib: ca-certificates and openssl@3
==> Installing wimlib dependency: ca-certificates
==> Pouring ca-certificates--2022-10-11.all.bottle.tar.gz
==> Regenerating CA certificate bundle from keychain, this may take a while...
🍺  /opt/homebrew/Cellar/ca-certificates/2022-10-11: 3 files, 225.5KB
==> Installing wimlib dependency: openssl@3
==> Pouring openssl@3--3.0.5.arm64_monterey.bottle.tar.gz
🍺  /opt/homebrew/Cellar/openssl@3/3.0.5: 6,444 files, 27.9MB
==> Installing wimlib
==> Pouring wimlib--1.13.6.arm64_monterey.bottle.tar.gz
🍺  /opt/homebrew/Cellar/wimlib/1.13.6: 64 files, 3.0MB
==> Running `brew cleanup wimlib`...
==> Pouring cdrtools--3.02a09.arm64_monterey.bottle.tar.gz
🍺  /opt/homebrew/Cellar/cdrtools/3.02a09: 209 files, 5.9MB
==> Running `brew cleanup cdrtools`...
==> Installing chntpw from sidneys/homebrew
==> Installing dependencies for sidneys/homebrew/chntpw: sidneys/homebrew/openssl@1.0
==> Installing sidneys/homebrew/chntpw dependency: sidneys/homebrew/openssl
==> Patching
==> Applying openssl-1.0.2u-darwin-arm64.patch
patching file Configure
==> perl ./Configure --prefix=/opt/homebrew/Cellar/openssl@1.0/1.0.2u_1 --openss
==> make
==> make test
==> make install MANDIR=/opt/homebrew/Cellar/openssl@1.0/1.0.2u_1/share/man MANS
🍺  /opt/homebrew/Cellar/openssl@1.0/1.0.2u_1: 1,787 files, 11.5MB, built in 2 minutes 3 seconds
==> Installing sidneys/homebrew/chntpw
==> make OSSLPATH=/opt/homebrew/opt/openssl@1.0
🍺  /opt/homebrew/Cellar/chntpw/0.99.6_1: 5 files, 292.5KB, built in 1 second
==> Running `brew cleanup chntpw`...
==> `brew cleanup` has not been run in the last 30 days, running now...
Disable this behaviour by setting HOMEBREW_NO_INSTALL_CLEANUP.
Hide these hints with HOMEBREW_NO_ENV_HINTS (see `man brew`).
Removing: /Users/m1_macbookair2020/Library/Caches/Homebrew/bash-completion--1.3_3... (141.8KB)
:
:
:
Removing: /Users/m1_macbookair2020/Library/Logs/Homebrew/lua@5.3... (64B)
Removing: /Users/m1_macbookair2020/Library/Logs/Homebrew/nmap... (64B)
Pruned 0 symbolic links and 6 directories from /opt/homebrew
それぞれのフォーミュラと依存関係あるパッケージがインスールされました。
cabextractwimlibcdrtools
5. フォーミュラ追加②:brew install aria2(aria2cではないので注意)
実行結果
~/Downloads/22000.1098_arm64_ja-jp_multi_5e9df300_convert % brew install aria2
==> Downloading https://ghcr.io/v2/homebrew/core/gettext/manifests/0.21.1
:
:
:
==> Downloading from https://pkg-containers.githubusercontent.com/ghcr1/blobs/sh
######################################################################## 100.0%
==> Upgrading git
  2.37.3 -> 2.38.0

==> Pouring git--2.38.0.arm64_monterey.bottle.tar.gz
==> Caveats
The Tcl/Tk GUIs (e.g. gitk, git-gui) are now in the `git-gui` formula.
Subversion interoperability (git-svn) is now in the `git-svn` formula.

zsh completions and functions have been installed to:
  /opt/homebrew/share/zsh/site-functions
==> Summary
🍺  /opt/homebrew/Cellar/git/2.38.0: 1,592 files, 48.1MB
==> Running `brew cleanup git`...
Removing: /opt/homebrew/Cellar/git/2.37.3... (1,562 files, 45MB)
==> Checking for dependents of upgraded formulae...
==> No broken dependents found!
==> Caveats
==> git
The Tcl/Tk GUIs (e.g. gitk, git-gui) are now in the `git-gui` formula.
Subversion interoperability (git-svn) is now in the `git-svn` formula.

zsh completions and functions have been installed to:
  /opt/homebrew/share/zsh/site-functions
これでようやっとUUP dump でスクリプトを実行する準備が整います。
③ UUP dump スクリプト(shファイル)からISOファイルを作成
文章
~/Downloads/22000.1098_arm64_ja-jp_multi_5e9df300_convert % ./uup_download_macos.sh
Downloading converters...

10/15 15:40:37 [NOTICE] Downloading 2 item(s)

:
:
:

10/15 15:42:04 [NOTICE] ダウンロード完了: UUPs/Microsoft-Windows-Client-Desktop-Required-Package.ESD

ダウンロード結果:
gid   |stat|avg speed  |path/URI
======+====+===========+=======================================================
ae6f9d|OK  |   9.5MiB/s|UUPs/Microsoft-Windows-Not-Supported-On-LTSB-arm64arm-Pa
:
:
:
a8b573|OK  |    47MiB/s|UUPs/Microsoft-Windows-Client-Desktop-Required-Package.ESD

凡例:
(OK):ダウンロード完了しました

UUP Converter v0.7.2
Note: This script does not and cannot support the integration of updates.
Use the Windows version of the converter to integrate updates.

:
:
:

CAB -> ESD: Microsoft-Windows-LanguageFeatures-TextToSpeech-ja-jp-Package-arm64

Creating ISO structure...
Applying image 1 ("Windows Setup Media") from "/Users/m1_macbookair2020/Downloads/22000.1098_arm64_ja-jp_multi_5e9df300_convert/UUPs/core_ja-jp.esd" to directory "ISODIR"
Extracting file data: 260 MiB of 260 MiB (100%) done
Done applying WIM image.

Exporting winre.wim...
Using LZX compression with 8 threads
Archiving file data: 1132 MiB of 1132 MiB (100%) done

Creating boot.wim...
[WARNING] Ignoring extended attributes of 1 files
"ISODIR/sources/boot.wim" original size: 435030 KiB
Using LZX compression with 8 threads
Archiving file data: 1182 MiB of 1182 MiB (100%) done
"ISODIR/sources/boot.wim" optimized size: 428349 KiB
Space saved: 6681 KiB

Exporting Windows 11 Core to install.wim...
Using LZX compression with 8 threads
Archiving file data: 8629 MiB of 8629 MiB (100%) done

Adding winre.wim for Windows 11 Core...
Scanning "/var/folders/rj/6pgsdrrd5j5ds52vf9t7xm9r0000gn/T/tmp.hrGtx7A1/winre.wim" (loading as WIM path: "/Windows/System32/Recovery/winre.wim")...
404 MiB scanned (1 files, 0 directories)
Using LZX compression with 8 threads
Archiving file data: 404 MiB of 404 MiB (100%) done

Exporting Windows 11 Professional to install.wim...
Using LZX compression with 8 threads
Archiving file data: 266 MiB of 266 MiB (100%) done

Adding winre.wim for Windows 11 Professional...
Scanning "/var/folders/rj/6pgsdrrd5j5ds52vf9t7xm9r0000gn/T/tmp.hrGtx7A1/winre.wim" (loading as WIM path: "/Windows/System32/Recovery/winre.wim")...
404 MiB scanned (1 files, 0 directories)
Using LZX compression with 8 threads
Archiving file data: 0 bytes of 0 bytes (0%) done

:
:
:
mv: ISODIR/boot/Fonts/segoen_slboot.ttf and ISODIR/boot/fonts/segoen_slboot.ttf are identical
mv: ISODIR/boot/Fonts/wgl4_boot.ttf and ISODIR/boot/fonts/wgl4_boot.ttf are identical
Creating ISO image...
Size of boot image is 8 sectors -> No emulation
Size of boot image is 3360 sectors -> No emulation
  0.22% done, estimate finish Sat Oct 15 15:46:01 2022
:
:
:
 99.79% done, estimate finish Sat Oct 15 15:46:07 2022
Total translation table size: 2048
Total rockridge attributes bytes: 0
Total directory bytes: 0
Path table size(bytes): 10
Max brk space used 0
2324840 extents written (4540 MB)
Done.
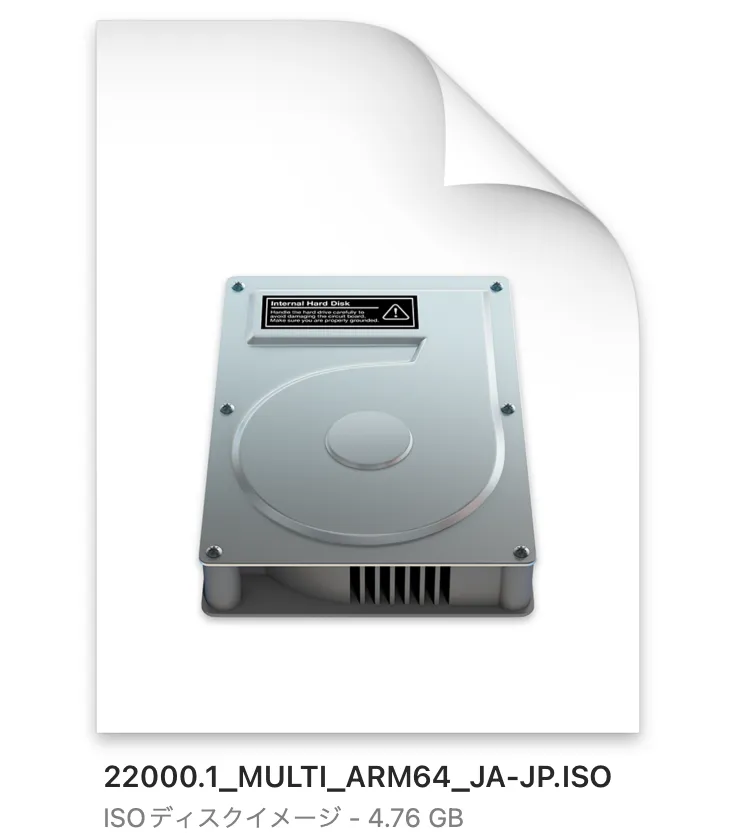
これで、ようやっとWindows11 ARM64ビルド版のISOファイルが作成されます。
というか、最初からISOファイルをダウンロードさせりゃ良いのに、クライアントでスクリプトを実行させてウィルスでも仕込んでんじゃね?とすら思ってしまいます。




コメント